How to use Google’s low latency cloud DNS for Your Website
DNS is among the most important parts in terms of site speed and DNS speed has a critical impact on how fast your site loads. The simple DNS we use in cpanel is generally not enough in terms of speed. It is why you need to use premium DNS. Cloudflare has become the most popular option when it comes to premium DNS. However, there are many features that you do not get without a pro account.
There are some other cost-effective options where you can get premium DNS at very low costs. Whether, yours is an average blog with 100,000 or less monthly users or a large website with readership in millions, you need global availability as well as low latency for speed.
Google Cloud DNS is also a cost effective option for users who want to use premium DNS for their websites. You can always rely on Google’s worldwide network in terms of resilience and availability. Another important advantage even for new users is the ease of set up. Setting up DNS on Google Cloud DNS is not a tedious task and apart from just entering a few DNS records and pointing them to the right IP, there is nothing complex involved in it.
The new customers can also spend the $300 that they get in free credits. However, to start using Google Cloud NDS, you will need to have billing enabled in your account. Based on Google’s low-cost pricing, even the $300 could last long enough.
How to create a DNS zone in Google Cloud DNS
In brief the process of setting your website DNS on GCP includes setting a billing account, creating a DNS zone and entering the DNS records.
Once you have created your account and set up billing, you can go to Network services and then Cloud DNS.
Setting DNS zone and DNS records in Google Cloud DNS:
You will need to create a DNS zone as a first step to set your DNS.
At the top, you will find a blue button for creating zones. Click on the button and start creating your first zone. Fill in the boxes with the necessary information.
Select the zone type as public since you want your website visible to users on the internet. A private DNS will have zone records that are visible internally within your google cloud network only.
Enter a zone name for your DNS zone. For example, I have named it example-website-zone.
In the DNS name, enter the domain name for which you are setting the DNS records.
Keep the DNSSEC off and cloud logging also off. Cloud logging will incur additional charges and you do not really need it.
Once you have filled all the required information, click on create at the bottom.
Your DNS zone has been created and you are taken to the zone details page.
The DNS zone is first populated with a set of basic records including SOA and NS records.
Click on the NS records to check out. You will find four records here.
Something like:
ns-cloud-b1.googledomains.com ns-cloud-b2.googledomains.comns-cloud-b3.googledomains.comns-cloud-b4.googledomains.com
you will need to add these records to change nameservers at your domain registrar’s.
However we need to add another set of basic records that are essential for DNS propagation and running your website. You will need to add at least an A record and a CNAME record to use the DNS zone.
Start with adding an A record.
To add a new record, click on add record set.
In the DNS name section enter @ or leave it blank. The default selection in the resource Record Type section is A record. Leave it as it is.
For routing policy use the default option, which is default record type and then add the IPV4 address or the IP address of your domain. After filling this information, click on create at the bottom.
Now, go on to create another record set in the same manner.
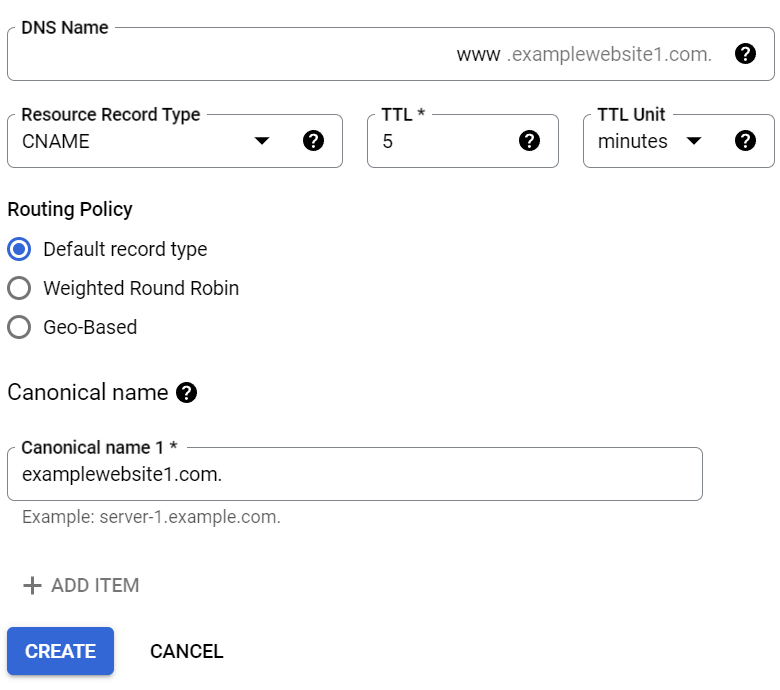
This time add www in DNS name. As in our case, it becomes www.examplewebsite1.com
In the box below it titled Resource Record Type, select CNAME.
The routing policy will remain as the default record type.
In the last box labelled canonical name, add the naked domain – examplewebsite1.com.
Please note that when you are entering a CNAME record in google cloud DNS, it is slightly different than adding another record like an A record. The canonical name record must be followed by a period. (example.com.) In case of most DNS hosting providers including Cloudflare and AWS Route53, CNAMEs do not follow a special scheme. However, this is different in case of Google Cloud DNS. If you do not add the period at the end of the canonical name, it will not accept the value.
Basically, we are done here. You can add more records like MX records and TXT records if you need.
However, now it is the time to change nameservers. Go to your domain registrar account. For example, you will find your domain listed on the my products page in Godaddy account. Here, you need to go to managing DNS and edit name server records.
You must select the option to add your custom nameserver records in your Godaddy account and then add the four NS records provided by Google Cloud DNS.
ns-cloud-b1.googledomains.com
ns-cloud-b2.googledomains.com
ns-cloud-b3.googledomains.com
ns-cloud-b4.googledomains.com
Enter these records and save. That’s all. You have successfully added your domain DNS to Google Cloud DNS. If you need to add more CNAME records like one for your cdn domain, you can again add it as I detailed above. The only thing to keep in mind when adding a CNAME record to Google Cloud DNS is that it must be followed by a period (any CNAME record).
If you want to add all the records in your DNS zone at your hosting provider, you can copy and add them too. Go to DNS zones in your cpanel account and copy the records from there.
How to delete a Google Cloud DNS zone
If you ever need to move your DNS from Google Cloud DNS, you will need to delete the hosted DNS zone.
To do so, you will first need to delete all the additional record sets you have added to the hosted zone.
You can leave the two basic records that Google provides – SOA and NS records.
Once you have deleted the additional records, you can delete your hosted zone. However, the delete zone button would be active only when you have deleted all the other records except the SOA and NS records.
Google cloud DNS Features and Benefits:
Google Cloud DNS offers several major benefits and one of them is its cost effectiveness. You pay next to nothing for hosting one DNS zone. For example, one DNS zone with one million queries per month costs only $0.60 according to its pricing estimator. If you have around $300 in free credits, you do not have to worry about payment. You can easily host a small wordpress site on a Cloud VM instance and host your DNS zone in cloud DNS for at least 6 months at no cost.
Another important feature of Google cloud DNS is its high speed. Google Cloud DNS uses its global network of anycast name servers for serving DNS zones from several locations globally, providing both higher availability and lower latency.
Google Cloud DNS is also very easy to use. Not just some ten or a hundred DNS records, you can manage millions of them and easily track them from the console. You do not need to worry for security either. When creating a public zone, you can enable or disable DNSSEC. Cloud Domains’ integration with Cloud IAM provides secure domains management with full control and visibility for domain resources.
A few last words:
In case of most of the premium DNS providers, the main benefits are available for a premium price. However, while Google Cloud DNS is much easier to set and manage, the pricing is also very user friendly. If you are just starting a blog, then instead of using your hosting DNS, you must use Google Cloud DNS. Setting a hosted zone takes no more than a few minutes. You do not have to worry for availability and the DNS spreads globally through Google’s network of any case name servers withing seconds. Hosting your DNS on Google Cloud DNS also offers a hassle-free experience. You can just set it and forget about it. All you need to do is to change your nameservers at your domain registrar’s. Following that there is nothing else you would need to do. No worrying about 5xx or other errors. Even buying a pro Cloudflare plan costs you $20. Compared to that, Google offers a premium and global DNS service at a much lower cost. With $300 in credits, you can start a blog and host it on Google Cloud and use Google’s premium DNS service along with its CDN and load-balancing for months.